Monday, August 27, 2012

Install LAMP and Wordpress on Ubuntu 12.04


Install LAMP

Open terminal and Type the command :install it   first  with
sudo apt-get install tasksel
Now to install LAMP, type the taskel command in terminal :
sudo  tasksel
And select LAMP Server:
During the installation  you  will be  asked  to insert the  mysql root  password
Create info.php file:
<?php
phpinfo();
?>
and save to /var/www
restart apache2 ,
#sudo /etc/init.d/apache2 restart
Now open browser and type :
http://ip/info.php or http://localhost/info.php
PHP is installed.
To full manage  your  lamp Server database, install  phpmyadmin
sudo  apt-get  install  phpmyadmin
To login  to phpmyadmin, open browser and type :
http://ip/phpmyadmin   or http://localhost/phpmyadmin


Install Wordpress

1. Create a new database for your new site in phpmyadmin and create new user with full privileges.
2. Create your site folder in /var/www
3. Download latest version of Wordpress from wordpress.org and extract it into your new site folder

4. Open wp-config-sample.php file, make the following changes and save the file as wp-config.php:

define('DB_NAME', 'YourDatabaseName');/** MySQL database username */define(‘DB_USER’, ‘root’);/** MySQL database password */define(‘DB_PASSWORD’, ‘YOUR MYSQL PASSWORD’);/** MySQL hostname */define(‘DB_HOST’, ‘localhost’);Get credentials from: https://api.wordpress.org/secret-key/1.1/salt/and replace default lines with the lines from link.


Friday, August 24, 2012

Turning off comments for Wordpress pages


  1. If you want to have comments in your blog posts but not on pages:
    1. Open page.php
    2. Find: 
    <?php comments_template( '', true ); ?> 
    3. Comment it out:
    <?php// comments_template( '', true ); ?>

User Interface Design: What are the best UI elements (controls, patterns, etc.) that have cropped up in modern web sites and web apps recently?

Source

What to do if Virtualbox won't go full-screen


These are the steps to take if just clicking on "Install Guest Additions" isn't working.

1. Start the Virtualbox instance that you would like to see in full-screen
2. Go to the 'Devices' menu for VirtualBox.
3.
Select 'Install Guest Additions'.
4.
Open Terminal
5. Navigate to root and then:

> cd media
> cd VBOXADDITIONS_4.1.20_80170 (or whatever your vbox folder is called)
>
sudo sh ./VBoxLinuxAdditions.run

6. Wait for update to complete.
7. Once complete, shut down Ubuntu.
8. Restart VirtualBox


Thursday, August 23, 2012

Useful link


Moving WordPress to a new server


http://www.jasonbobich.com/web-design/moving-wordpress-to-a-new-server/

Relocate Wordpress


These instructions will help you set up your dev site locally and fix broken links within the site after the move

WordPress supports an automatic relocation method intended to be a quick assist to getting a site working when relocating a site from one server to another.

Steps

1. Edit the wp-config.php file.
2. After the "define" statements (just before the comment line that says "That's all, stop editing!"), insert a new line, and type: define('RELOCATE',true);
3. Save your wp-config.php file.
4. Open a web browser and manually point it to wp-login.php on the new server. For example, if your new site is athttp://www.mynewdomain.com, then type http://www.mynewdomain.com/wp-login.php into your browser's address bar.
5. Login as per normal.
6. Look in your web browser's address bar to verify that you have, indeed, logged in to the correct server. If this is the case, then in the Admin back-end, navigate to Settings > General and verify that both the address settings are correct. Remember to Save Changes.
7. Once this has been fixed, edit wp-config.php and either completely remove the line that you added (delete the whole line), comment it out (with //) or change the true value to false if you think it's likely you will be relocating again.
Note: When the RELOCATE flag is set to true, the Site URL will be automatically updated to whatever path you are using to access the login screen. This will get the admin section up and running on the new URL, but it will not correct any other part of the setup. Those you will still need to alter manually.
8. Click on Settings > Permalinks. Click on Default and click Save Changes.

UPDATE WORDPRESS ON LOCALHOST

Reposted from New Think Tank


Wordpress Problems SolvedEver since I wrote Install WordPress on a Localhost I’ve received a bunch of requests on how to update WordPress on a localhost. It is actually extremely easy.
I think what frustrates people is the fact that WordPress automatic updates don’t work on most development servers? Don’t worry about that. It is actually very easy to update WordPress manually.

The first thing you should do is download the most current version of WordPress here latest WordPress.
Now just to be safe, make a copy of your current WordPress folder on your localhost machine. You then have to copy all of the files and folders (except for the wp-content folder)!!!
Now paste those files and folders into your old WordPress folder. Notice that the wp-config.php file is not in the latest WordPress folder. This file shouldn’t be touched because it contains setup information specific to your WordPress setup.
After you’ve copied everything, go to your admin page in a browser localhost/wordpress/wp-admin for example. When you login you’ll see the following message.
Wordpress Update Database
Just click the Update WordPress Database button and wait a few seconds and you’ll see this.
Wordpress Update Complete
That’s it! Now your version of WordPress is up to date. I hope that helps?
Till Next Time

Wednesday, August 22, 2012

Fixing Your iPhone After Gmail Two Step Verification Messes It Up

At the beginning of the month, a Wired magazine writer (read: tech savvy person) had his entire online life hacked. The story was sufficiently scary to encourage me to take the relatively small step of turning on two-step verification for my Gmail account. 

The upside of this step is that it made my email and thus other online accounts more secure. The down side is that everything that interfaced with Gmail broke.

The most annoying thing was that I was no longer able to send emails from applications in my iPhone (like the camera and craigslist apps). I ineffectually whined about that for a week or so and then tried for another week to get Jon to just fix it for me. Finally, I caved and fixed it myself. 

It wasn't as painful as I expected. Here are the steps in case this has happened to you and your significant other/business partner has refused to fix it for you:

1. Go to https://accounts.google.com/b/0/IssuedAuthSubTokens#accesscodes and login using your normal Gmail username and password.

2. Scroll down to the section that says Application Specific Passwords.


3. Type in some text explaining what application you are getting a password for (e.g. iPhoneGmail) and click Generate Password


4. Keep that window open while you go to your iPhone and navigate to Settings -> Mail, Contacts, Calendars -> Gmail


5. Click on your email address next to Account.


6. Click on your current password, delete it and enter the application specific password that you generated in step 3.


7. Optional: test it that it worked. I tested it by sending myself a photo from my camera. 

And that's it! You are now a rockstar who didn't let the annoyance factor of two step verification stop you from making your data more secure. Congratulations!

Tuesday, August 21, 2012

Set up Ubuntu virtualbox to edit client site locally


Set up Ubuntu virtualbox to edit client site locally

aka

Pull .git repo to virtualbox and install LAMPP in Ubuntu 12.04


~~~~~~~~~~~~~~~~~~~~~~~~~~

Pull .git repository


Step 1

Create Development folder under /home/your_Ubuntu_username/Documents/Development.


Step 2

Open terminal (in virtualbox) and install git:

> sudo apt-get install git


Step 3

Go to bitbucket and navigate to repository you want to pull.


Step 4

In the open terminal,enter the clone command from the bitbucket site. For example:

git clone https://bitbucket_email_address/folder/site_folder.git

~~~~~~~~~~~~~~~~~~~~~~~~~~~~~~~~~~~~~

Install LAMPP


Step 1

Login as root, type this command in the terminal and enter your Ubuntu password. You can launch the terminal command line by pressing Control- ALT- T:
> sudo -s -H

Step 2

The first thing to install is the MySQL server. Enter this command:
> apt-get install mysql-server mysql-client
It will start downloading packages, so you have to wait. Then you will be required to enter your MySQL root password. Make sure you will remember this as you will be using this during WordPress installation. The username will default to “root”.

Step 3

The next thing to install will be Apache. This is your web server. Type the command below:
> apt-get install apache2

Step 4

You will then need to install PHP. This is the server scripting language used by WordPress. Enter this command:
> apt-get install php5 libapache2-mod-php5

Step 5

After installing PHP, you need to restart the Apache server by entering this command:
> /etc/init.d/apache2 restart

Step 6

In the command prompt, navigate to your Ubuntu home directory by entering the command:
> cd /home/your_Ubuntu_username/Documents/Development
Replace “your_Ubuntu_username” with your correct username. To make sure you are now in your Ubuntu home directory, type this command:
> pwd
It should return:
/home/your_Ubuntu_username/Documents/Development

Step 7

Confirm that your site folder is in your Development folder.

Step 8

It is time to assign proper file permissions to document root folder that will be used by Apache and WordPress. First, change the CHMOD of your site folder folder to 755:
> chmod -R 755 site_folder
This will make the www folder readable/writable by Apache which is important. The additional parameter -R means that all files/folders inside the folder (e.g. your WordPress files) will get that permission as well.

Step 9

Next, you need to ensure that Apache has permissions to read and write your home directory. Enter this command:
chmod 755 /home/your_Ubuntu_username/Documents/Development
and:
chmod 755 /home/your_Ubuntu_username/Documents/
and:
chmod 755 /home/your_Ubuntu_username/
and:
chmod 755 /home/
The main purpose of doing this is to prevent 403 forbidden errors in Apache when accessing your WordPress website or any HTML/PHP files after changing your document root in Step10.

Step 10

Confirm that you have correctly set permissions by running the following set of commands:
a.) Check if your site folder directory is now using 755 as the permission:
stat -c '%a' /home/your_Ubuntu_username/Documents/Development/site_folder
You should see 755 as the return value.
b.) Check the rest of your directories using 755:
stat -c '%a' /path/you/are/checking

Step 11

By default (after Apache installation in Step3); the document root of Apache accessible by the web browser is found in this path:
/var/www
In the previous steps, you have changed it to use your Ubuntu home directory such that the new path will be:
/home/your_Ubuntu_username/Documents/Development/site_folder
This new path is now configured with proper file permissions that Apache can access. Finally, you need to configure your Apache configuration to use this new path. Follow the steps below carefully and make sure you are still logged-in as root:
a.) Open the enabled sites configuration in Apache using the terminal:
pico /etc/apache2/sites-enabled/000-default
The text editor should look like this:
b.) Change the two instances of /var/www to use your new document root path found in your Ubuntu home directory. For example this is the edited version:

You need to be careful not to change any of the existing lines or code. To save the changes; press Control – Othen press enter. To exit the editor, press Control – X.

Step 12

Restart Apache:
/etc/init.d/apache2 restart

Step 13

WordPress will be using a lot of PHP modules for proper operation. You should also install these modules. Copy and paste the command below to the terminal:
apt-get install php5-mysql php5-curl php5-gd php5-intl php-pear php5-imagick php5-imap php5-mcrypt php5-memcache php5-ming php5-ps php5-pspell php5-recode php5-snmp php5-sqlite php5-tidy php5-xmlrpc php5-xsl

Step 14

Restart Apache again:
/etc/init.d/apache2 restart

Step 15

Using your favorite code editor (gedit will do), create a PHP file called as info.php containing the following code to test your Apache and MySQL installation:
<?php
phpinfo();
?>
Save info.php to your document root folder path:
/home/your_Ubuntu_username/Documents/Development/site_folder

Step 16

Now access info.php in the web browser by typing this in the address bar:
http://localhost/info.php
You should be able to see the details of your PHP configuration settings without any errors.


Step 17

Installing phpMyadmin
phpMyAdmin is a free software tool written in PHP intended to handle the administration of MySQL over the World Wide Web.
Open Terminall. And type the below code in terminal and hit enter.
sudo apt-get install phpmyadmin
Type your ubuntu password if needed.
Type y and hit enter to confirm phpMyadmin installation.
During the installation you will be prompted for a webserver configuration.
Select
apache2
(already selected)
press enter.

Now you will be promped for phpmyadmin configuration
Select
No
and press enter.

Type below command in terminal
sudo cp /etc/phpmyadmin/apache.conf /etc/apache2/conf.d
restart your apache server using
sudo /etc/init.d/apache2 restart
Open your browser and type
http://localhost/phpmyadmin/
in the address bar and press enter.
Type your mysql root  username and password to login.

~~~~~~~~~~~~~~~~~~~~~~~~~~~~~~~~~~~~~~~~~~~~~~~~
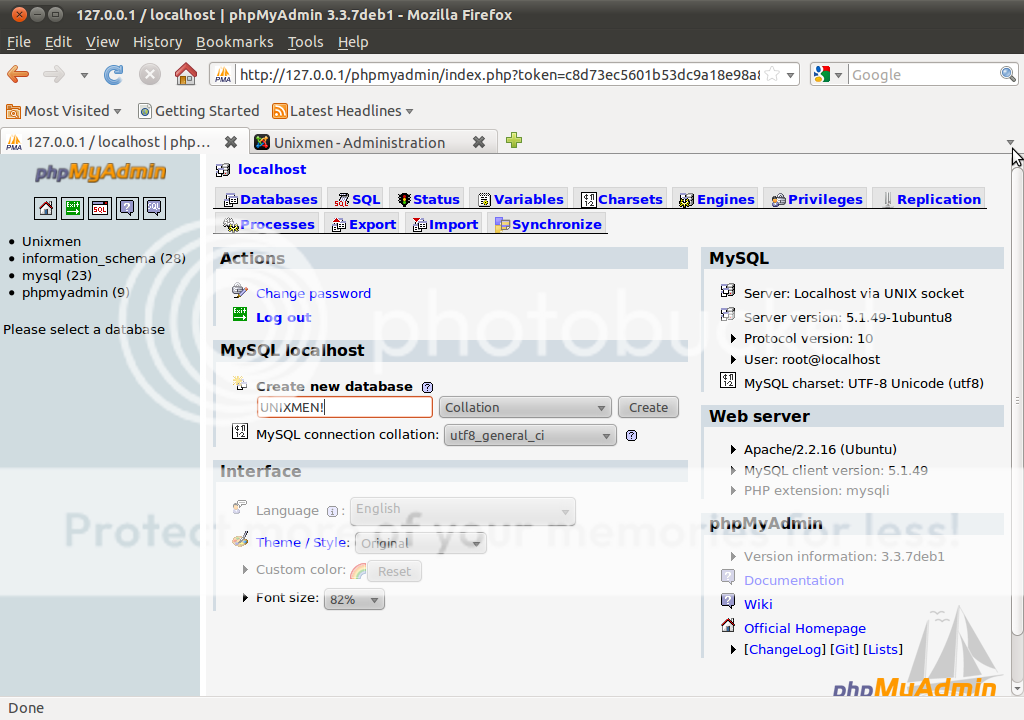
Upload database to phpMyAdmin

Step 1

Open wp-config.php file in site folder.
Comment out the line that says define('DB_HOST', 'host_name'); by putting // in front of it.
Add a new line that says define('DB_HOST', 'localhost');

Step 2

Open a browser and type in http://localhost/phpmyadmin.
Login using the credentials found in the wp-config.php file.
Click on Databases - the first tab along the top.
Under create new database, paste the name of the database from the wp-config.php file and click Create.
Click on the database you just created from the list on the left.
Click on Privileges - the last tab along the top.
Click on Add a new User link and add the user, using the username and password from the wp-config.php file and granting the user all (global) privileges.

Step 4

Click on your database from the list at the left.
Click on import and select your database file (.sql). Zip it if necessary. Import it into your new database.

Step 5

Go back to the browser and type in http://localhost. Your site should now load in the browser window.

Sunday, August 05, 2012

How to convert jpg/png to eps

Source

Instructions

  1. Create Your Own Free Vector Art

    • 1
      Download Inkscape, an open-source freeware vector imaging program (see Resources). Click "Download," then click "Run" to install the program on your computer.
    • 2
      Select "Open Program."
    • 4
      Browse your folders to locate the JPEG file you wish to convert to a vector image. Select the image file and click "OK."
    • 5
      Go to the menu bar at top and select "Path," then click on "Trace Bitmap."
    • 6
      Select the option for "Colors" on the lower left, then increase the number of "Scans" a few times and click on the bar labeled "Update" below the preview image. Raising the number of scans increases the resolution of the image, which also increases the file size and speed of rendering. Experiment with the settings to find what works best for your purpose with your computer's capacity. Remember to click "Update" each time you change a setting.
    • 7
      Save the image as one of the vector image formats provided. An EPS file is a good choice for most applications.

Read more: How to Convert a JPEG to a Vector Image | eHow.com http://www.ehow.com/how_4421430_convert-jpeg-vector-image.html#ixzz22hp8tcnm